많은 사용자가 Steam을 다운로드하지 못하는 문제를 경험합니다. 콘텐츠 서버에 다운로드 할 수 없다는 메시지가 표시됩니다. 이 문제는 특히 사용자의 많은 구성으로 인해 하나의 문제로 인한 것이 아니라고 말할 수 있습니다. Steam 지원 및 사용자의 모든 방법을 포함하는 일부 솔루션을 나열했습니다.

해결 방법 1 : 프록시 설정 제거
프록시 서버는 개방형 인터넷 액세스가 제한된 조직에서 사용됩니다. 프록시는 네트워크를 추적하고 사용자에게 대체 게이트웨이를 제공하는 데 사용됩니다. 프록시 설정은 Steam이 다운로드를 위해 서버에 연결을 시도 할 때 종종 장애물이됩니다.
컴퓨터에서 프록시를 비활성화하는 방법에는 두 가지가 있습니다.
방법 1 : Chrome
- Chrome 브라우저 를 열고 열면 Chrome 메뉴 (오른쪽 상단)를 클릭 합니다 .

- 드롭 다운이 나타나면 설정을 클릭 합니다 .

- 설정 페이지가 열리면 상단에있는 대화 상자에 " proxy "를 입력 합니다.

- 검색 결과에서 " open proxy settings " 라는 결과를 선택합니다 .

- 설정이 열리면 하단에있는 연결 탭에서 “ LAN 설정 ”을 클릭합니다 .

- " 자동으로 설정 감지 "라인을 선택 취소하십시오 . 변경 사항을 저장하고 종료합니다. Steam을 다시 시작하십시오.

방법 2 : 네트워크 설정을 통해
- Windows + R 버튼을 눌러 실행 응용 프로그램을 불러옵니다.
- 대화 상자에“inetcpl. cpl ”.

- 인터넷 속성이 열립니다. 연결 탭으로 이동하여 LAN 설정을 클릭하십시오.
- LAN 설정에서 " 자동으로 설정 감지 "라고 표시된 행을 선택 취소하십시오 . 변경 사항을 저장하고 종료하여 Steam을 다시 시작하십시오.
해결 방법 2 : Chrome 확장 프로그램 비활성화
때로는 Chrome에있는 확장 프로그램이 실제 장애물을 만들 수 있습니다. 네트워크 설정, 특히 " Ghostery " 라는 추가 기능을 방해합니다 . 네트워크를 모니터링하고 디지털 발자국을 남기는 위치에 대한 통계를 제공합니다. 또한 데이터에 액세스 할 수없는 웹 사이트를 제어 할 수도 있습니다. 다운로드를 진행하기 전에 Chrome에서 이러한 추가 기능을 비활성화하는 것이 좋습니다. 그들에 의해 문제가 발생했다면 해결 될 것입니다.
여기 에는 Chrome 확장 프로그램 만 포함되는 것이 아니라 네트워크 (데이터 모니터, VPN 등)와 관련된 모든 프로그램을 비활성화해야합니다. 더 복잡한 추가 솔루션을 진행하는 것보다 시도하는 것이 좋습니다.

해결 방법 3 : 다운로드 지역 변경
기본 수정 중 하나는 다운로드 지역 변경을 포함합니다.
Steam 콘텐츠 시스템은 여러 지역으로 나뉩니다. 클라이언트는 네트워크를 통해 지역을 자동으로 감지하고이를 기본값으로 설정합니다. 때로는 특정 지역의 서버가 과부하되거나 하드웨어 오류가 발생할 수 있습니다. 따라서 다운로드 지역을 변경하면 문제가 해결 될 수 있습니다. 추가 솔루션을 진행하기 전에 항상 다운로드 지역을 여러 번 변경해 볼 수 있습니다 (한 번의 시도로 제한되지 않음).
- Steam을 열고 창의 왼쪽 상단에있는 드롭 다운 메뉴에서 ' 설정 '을 클릭하십시오 .
- ' 다운로드 '를 선택 하고 ' 다운로드 지역 '으로 이동합니다 .
- 다른 지역을 선택하고 Steam을 다시 시작하세요.

해결 방법 4 : clientregistry.blob 삭제
Steam의 클라이언트 레지스트리가 손상 될 수 있으며 이것이 오류가 발생한 이유 일 수 있습니다. 이름을 바꾸거나 삭제할 수 있습니다.
- Steam을 완전히 종료하고 위의 해결 방법에서 언급 한대로 모든 작업을 종료하십시오.
- Steam 디렉토리를 찾습니다. 기본값은 C : \ Program Files \ Steam 입니다.
- ' clientregistry.blob'를 찾습니다 .

- 파일 이름을 ' clientregistryold.blob ' 로 바꾸십시오 (또는 파일을 완전히 삭제할 수 있음).
- Steam을 다시 시작하고 파일을 다시 생성하십시오.
클라이언트가 예상대로 실행되기를 바랍니다. 그래도 작동하지 않으면 아래 나열된 단계를 따르십시오.
- Steam 디렉토리로 돌아갑니다.
- 'Steamreporter'를 찾습니다. exe '.

- 응용 프로그램을 실행하고 Steam을 다시 시작하십시오.
해결 방법 5 : Steam 다운로드 대기열 지우기
Steam 클라이언트에 대기중인 다운로드가 많으면 하나를 제외한 모든 다운로드를 제거하고 Steam을 다시 시작하는 것이 좋습니다.
- Steam 클라이언트를 열고 라이브러리 탭으로 이동하세요.
- 하단에“ 다운로드 일시 중지됨 ” 이라는 클릭 가능한 옵션이 표시됩니다 . 대기중인 모든 옵션이 앞으로 나오도록 클릭합니다.

- 대기열 에서 항목 을 제거하려면 아래 그림과 같이 버튼을 하나씩 클릭하십시오 .

- Once you have removed them, right click on games (except the one which you want to download first) so the settings come forward. Once the Settings open, click on “Uninstall” button.

- Steam will prompt you to confirm your actions. Click Delete when the prompt comes forward and restart Steam before trying to download that one game again.

Solution 6: Using flush config
We can try running the flush config command to reset the configuration. Follow the steps below.
- Press Windows + R to bring up the Run application.
- In the dialogue bar, type “steam://flushconfig”.

- Press OK. Steam will now pop a window to confirm your actions. Press Ok and restart Steam.

Solution 7: Starting Steam in Safe mode with networking.
Before resorting to more technical methods, you can try running your PC in safe mode (with networking) and try to start the Steam download.
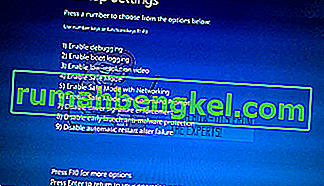
- Get your computer to safe mode by selecting from various options available. Select ‘Enable Safe Mode with Networking’. You can learn how to get your PC to safe mode from here. If you are running Windows 7, press F8 upon the startup of your PC and you will be directed to a similar window where you can select the required option.
- Open Steam and try updating/installing with it again. This method should remove all obstacles (if any) which your Steam may be experiencing.

Solution 8: Disabling Safe-web from router
Your WiFi router may have a setting called safe-web in it. What this does is filter all the incoming data it deems are not trustworthy. It is very common for it to flag Steam as one and disrupts the connection with your computer.
Since there are hundreds of different routers used by the users, it is very difficult to list the solution on how to disable the option for every one of them. Here are some guidelines so you can have an idea.
- Web Safe can be found in the parental control section on the WiFi router configuration.
- It can also be found on the Virus section or the Filtering section.
- To enter your router settings, type the IP which is associated with it (for example for some it is 192.168.1.1). You can check the required IP either by calling your modem provider or by looking at the back of the device ( even its packaging box may have details).
Solution 9: Disabling Anti-virus and Defender/firewall
Before proceeding to reinstall Steam, we can try meddling with the antivirus. Antivirus monitors each packet of your computer sends and receives. Although Steam has collaborated with most of them so they don’t give problems, sometimes they do. The solution is to disable/uninstall them and check if you are able to download then.
McAfee Antivirus:
McAfee has no way to exclude certain files from its real time scanning. The only way is to disable the antivirus entirely until the game is updated. To do this, open McAfree and select “Virus and Spyware Protection”. Here you find the option of “Real-Time Scanning”. Click that option and turn it off.

Then follow the following instruction to verify integrity of game files.
- Restart your computer and relaunch Steam.
- Head over to the library section and right click on the game which is giving you problems.
- Click on its properties and select the local files tab.
- Click the verify integrity of game files button and Steam will verify that game in a few minutes.
Hopefully, after performing the above steps, your Steam won’t give any issue.

ESET NOD32
NOD32 has the tendency to mark some application files as malicious and will most probably quarantine it. This often results in the error while updating a game. Browse to your current Steam directory and copy the address
- The default location for your steam folder should be “C:\Program Files (x86)\Steam”.
Press ⊞ Win + R button. This should pop-up the Run application.
In the dialogue box write “C:\Program Files (x86)\Steam”.

Or if you installed Steam in another directory, you can browse to that directory and you can proceed with steps mentioned below.
After copying the address open ESET NOD32 and paste the location in exclude from real time scanning.
Follow the ‘verify integrity of game files’ method listed above and you will be all good.

Kaspersky AV
Kaspersky may sometimes flag Steam as an intruder and disable it from making any changes to the hard drive. To fix this, head over to ‘threats and exclusions’. Navigate to ‘trusted zone’ and add Steam.exe as a trusted application. Remember to change the settings to Do not restrict application activity as well as Do not scan opened files.
Follow the ‘verify integrity of game files’ method listed above and restart your computer.

Windows Defender
- Click Windows button and in the search bar type “Windows defender”. Among all the options, there will be an application named “Windows Defender Security Center”. Open it.
- Upon opening, you will find a list of options available in the new window. Select the option “Virus and threat protection”.

- Upon entering the menu, navigate to Virus and Threat Protection Settings. Windows may prompt you to allow administrator access to use this feature. If so, press Yes.

- After entering the required menu, you should search the window which says “Add or remove exclusions”. Click it and you will be navigated to a menu where you can add exclusions. You can exclude folders, extensions, and even files. In this case, we will exclude the whole Steam folder which is located in the directory you downloaded it.

- Click on the option which says “Exclude a folder” and navigate to your Steam directory. The default location for your steam folder should be “C:\Program Files (x86)\Steam”. Once you reach the location select the folder and save changes.
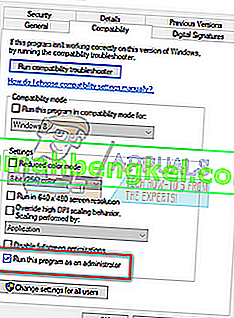
- Restart your computer and run Steam with administrative privileges. Hopefully, your speed issue will be resolved.
Solution 10: Downloading Latest Steam Client
- The default location for your steam folder should be “C:\Program Files (x86)\Steam”.
Press ⊞ Win + R button. This should pop-up the Run application.
In the dialogue box write “C:\Program Files (x86)\Steam”.

Or if you installed Steam in another directory, you can browse to that directory and you can proceed with steps mentioned below.
- Locate the following folders:
Steam.exe (Application)SteamApps (Folder)Userdata (Folder)
- Delete all the other files/folders/applications except the ones mentioned above.
- Head over to the Steam website and download the latest Steam client. Don’t launch the old Steam.exe present in your directory at all. The problem won’t be solved.
- Install Steam using the installer in the same directory as your previous one. Hopefully, after installation, the problem will be solved.
Solution 11: Changing Default Browser
In a weird turn of events, having Chrome or any other browser set as the default browser sometimes causes issues with the download request that Steam sends to its servers. Therefore, in this step, we will be setting internet explorer as our default browser temporarily to make sure that the download proceeds. For that:
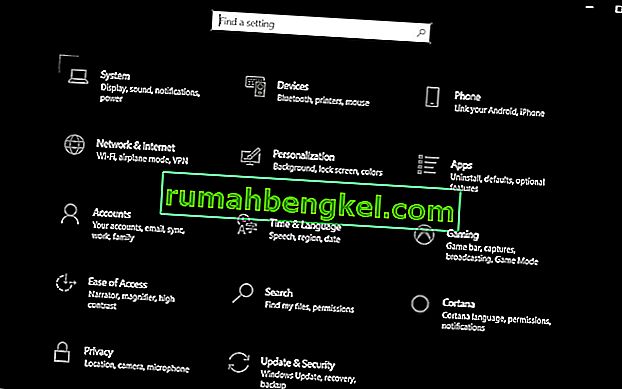
- Press “Windows’ + “I” to open settings.
- In settings, click on “Apps” and then select “Default Apps” from the left pane.
- Click on the “Web browser” option and then select “Internet Explorer” from the list.
- Open Steam and check to see if the issue persists.

Solution 12: Removing Steam Content Server Limiter
In certain cases, it was shown that uninstalling Steam Content Server Limiter from the Classical Control Panel interface fixes this issue for a lot of people. Therefore, in this step, we will be doing exactly that. For that:
- Press “Windows’ + “R” to open the Run prompt.
- Type in “Control” and press “Enter”.

- Click on the “Uninstalla Program” option and then right-click on the “Steam Content Server Limiter” and select “Uninstall”.
- After the server limiter is uninstalled, check to see if the issue persists.

Method 13: Changing DNS
In certain situations, the server DNS that the computer is using to communicate with the internet might not be compatible either with the steam servers or it might be facing issues temporarily. Therefore, in this step, we will be changing our DNS servers. For that;
- Press “Windows’ + “R” to open the Run prompt.
- Type in “ncpa.cpl” and press “enter”.

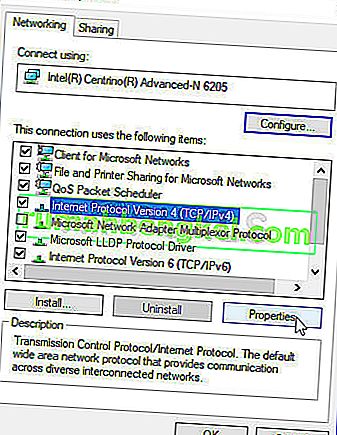
- Right-click on your network adapter and select “Properties”.
- In properties, double click on the “Internet Protocol Version 4(TCP/IPV4)” option and check the “Use following DNS Addresses” option.
- Type in “8.8.8.8” in the primary DNS address and “8.8.4.4” in the secondary DNS address.
- Click on “OK” and then check to see if the issue persists. If it does, try using “1.1.1.1” and “1.0.0.1” in the fields respectively.


Method 14: Changing Config File
In certain situations, the config file on the computer might require some editing in order to get it some games to start working. The steps listed below are primarily for Mac but you can try them on some older OS such as Windows XP too as some users reported that this fixed it for them.
- Open the Mac Finder and navigate to the following directory.
drive_c/Program Files/Steam/config/
- Launch the “config.vdf” file and wait for it to open.
- Find the following text lines inside the file.
"InstallConfigStore" { "Software" { "Valve" { "Steam" "cip" - Paste the following lines of code under the “cip” entry in the config after creating a new line under it.
CS" "valve511.steamcontent.com;valve501.steamcontent.com;valve517.steamcontent.com;valve557.steamcontent.com;valve513.steamcontent.com;valve535.steamcontent.com;valve546.steamcontent.com;valve538.steamcontent.com;valve536.steamcontent.com;valve530.steamcontent.com;valve559.steamcontent.com;valve545.steamcontent.com;valve518.steamcontent.com;valve548.steamcontent.com;valve555.steamcontent.com;valve556.steamcontent.com;valve506.steamcontent.com;valve544.steamcontent.com;valve525.steamcontent.com;valve567.steamcontent.com;valve521.steamcontent.com;valve510.steamcontent.com;valve542.steamcontent.com;valve519.steamcontent.com;valve526.steamcontent.com;valve504.steamcontent.com;valve500.steamcontent.com;valve554.steamcontent.com;valve562.steamcontent.com;valve524.steamcontent.com;valve502.steamcontent.com;valve505.steamcontent.com;valve547.steamcontent.com;valve560.steamcontent.com;valve503.steamcontent.com;valve507.steamcontent.com;valve553.steamcontent.com;valve520.steamcontent.com;valve550.steamcontent.com;valve531.steamcontent.com;valve558.steamcontent.com;valve552.steamcontent.com;valve563.steamcontent.com;valve540.steamcontent.com;valve541.steamcontent.com;valve537.steamcontent.com;valve528.steamcontent.com;valve523.steamcontent.com;valve512.steamcontent.com;valve532.steamcontent.com;valve561.steamcontent.com;valve549.steamcontent.com;valve522.steamcontent.com;valve514.steamcontent.com;valve551.steamcontent.com;valve564.steamcontent.com;valve543.steamcontent.com;valve565.steamcontent.com;valve529.steamcontent.com;valve539.steamcontent.com;valve566.steamcontent.com;valve165.steamcontent.com;valve959.steamcontent.com;valve164.steamcontent.com;valve1611.steamcontent.com;valve1601.steamcontent.com;valve1617.steamcontent.com;valve1603.steamcontent.com;valve1602.steamcontent.com;valve1610.steamcontent.com;valve1615.steamcontent.com;valve909.steamcontent.com;valve900.steamcontent.com;valve905.steamcontent.com;valve954.steamcontent.com;valve955.steamcontent.com;valve1612.steamcontent.com;valve1607.steamcontent.com;valve1608.steamcontent.com;valve1618.steamcontent.com;valve1619.steamcontent.com;valve1606.steamcontent.com;valve1605.steamcontent.com;valve1609.steamcontent.com;valve907.steamcontent.com;valve901.steamcontent.com;valve902.steamcontent.com;valve1604.steamcontent.com;valve908.steamcontent.com;valve950.steamcontent.com;valve957.steamcontent.com;valve903.steamcontent.com;valve1614.steamcontent.com;valve904.steamcontent.com;valve952.steamcontent.com;valve1616.steamcontent.com;valve1613.steamcontent.com;valve958.steamcontent.com;valve956.steamcontent.com;valve906.steamcontent.com"
- Save your changes and check to see if the issue persists.
Note: Some users reported to fix the issue after having to deleting the CM List IP addresses in the file aswell in addition to pasting this code.