은 " 원시 모드의 Hyper-V의 사용할 수없는 의례 ( VERR_SUPDRV_NO_RAW_MODE_HYPER_V_ROOT 가 가상 머신을 실행하려고 할 때 버추얼에 대한 오류가 나타납니다)". 일부 사용자의 경우 컴퓨터에서 Hyper-V 기술이 비활성화되어 있음에도 불구하고이 오류가 발생합니다.

이 오류를 수정하려고 할 때 첫 번째 중지는 Windows 기능에서 Hyper-V가 활성화되지 않았는지 확인하는 것입니다. 이미 비활성화 된 경우 다른 잠재적 인 원인은 활성화 된 하이퍼 바이저 검사, 활성화 된 Device Guard (Credential Guard) 또는 Core Isolation이라는 Windows Defender 보안 기능에 의해 촉진되는 일종의 간섭 일 수 있습니다.
그러나 이전 컴퓨터 구성에서는 하드웨어 가상화가 BIOS 또는 UEFI 수준에서 비활성화되어 있기 때문에이 오류가 표시 될 수도 있습니다.
1. Hyper-V 관리 도구 비활성화
" Hyper-V에서 원시 모드를 사용할 수 없음" 오류 를 일으키는 가장 큰 원인은 Hyper-V가 컴퓨터에서 활성화되어 있다는 사실입니다. 이 독점 Microsoft 가상화 기술을 사용하면 Windows 버전을 기본 방식으로 실행하는 x86 및 x64 시스템에서 가상 컴퓨터를 만들 수 있습니다.
그러나 VirtualBox 또는 VMware와 같은 타사 대안은 안정성을 위해 사용하지 않습니다. 더욱이, 그들은이 기술이 활성화 될 때 특히 작동을 거부합니다. 그러나 Windows 10은 이제 유사한 가상화 기술보다 Hyper-V의 우선 순위를 지정하도록 프로그래밍되었습니다.
상상할 수 있듯이 이것은 VERR_SUPDRV_NO_RAW_MODE_HYPER_V_ROOT 오류 코드를 포함하여 많은 문제를 일으킬 가능성이 있습니다 . 이 문제를 해결하려면 타사가 대신 할 수 있도록 Hyper-V를 비활성화해야합니다.
이 작업에 관해서는 두 가지 방법이 있습니다. 터미널에서 직접 수행하거나 프로그램 및 기능 GUI 메뉴에서 수행 할 수 있습니다. 선호하는 접근 방식을 따르십시오.
GUI를 통해 Hyper-V 비활성화
- 보도 Windows 키 + R은 업 엽니 다 실행 대화 상자를. 그런 다음 'appwiz.cpl' 을 입력 하고 Enter 키 를 눌러 프로그램 및 기능 메뉴 를 엽니 다 .

- 프로그램 및 기능 메뉴에 들어가면 오른쪽 메뉴를 사용 하여 왼쪽 창에서 Windows 기능 켜기 또는 끄기 를 클릭합니다 .
- Windows 기능 메뉴 내부에서 Hyper-V 폴더를 확장하십시오 . 그런 다음 마지막으로 확인을 클릭하기 전에 Hyper-V 관리 도구 및 Hyper-V 플랫폼 과 관련된 확인란을 선택 취소해야합니다 .
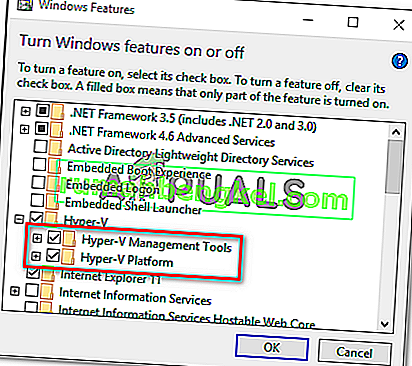
- 절차가 완료 될 때까지 기다린 다음 컴퓨터를 다시 시작하고 다음 시작 후 문제가 해결되는지 확인합니다.


CMD 터미널을 통해 Hyper-V 비활성화
- 보도 Windows 키 + R은 업 엽니 다 실행 대화 상자를. 그런 다음 텍스트 상자에 'cmd'를 입력 하고 Ctrl + Shift + Enter 를 눌러 고급 명령 프롬프트를 엽니 다. 마지막으로 UAC (사용자 계정 컨트롤)가 표시 되면 예 를 클릭 하여 관리 권한을 부여합니다.
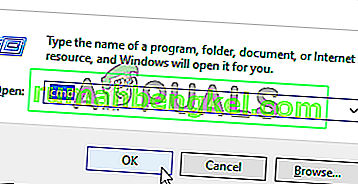
- 승격 된 CMD 터미널로 이동 한 후 다음 명령을 입력하거나 붙여넣고 Enter 키 를 눌러 Hyper-V 기능을 비활성화합니다.
dism.exe / Online / Disable-Feature : Microsoft-Hyper-V
- 명령이 성공적으로 처리되면 CMD 창을 닫고 컴퓨터를 다시 시작하십시오.
- 다음 시작시 Hyper-V 오류 로 인해 원시 모드를 사용할 수없는 원인이 된 작업을 반복 하고 문제가 이제 해결되었는지 확인합니다.

이 작업으로 문제를 해결할 수없는 경우 아래 지침에 따라 문제를 해결하는 다른 방법을 찾으십시오.
2. 하이퍼 바이저 검사 비활성화
결과적으로 Hyper-V가 비활성화 된 경우에도이 문제가 발생할 수 있습니다. 이 문제를 일으킬 수있는 한 가지 일반적인 시나리오는 HyperVisorLaunchType 서비스가 AUTO 로 설정된 인스턴스 입니다. 이렇게하면 모든 가상 머신이 시작되기 전에 시스템에서 VT-x를 사용하는 애플리케이션을 확인해야합니다.
영향을받는 여러 사용자는 Bcdedit 유틸리티를 실행하여 HyperVisorLaunchType 의 상태를 확인하고 자동으로 설정된 경우 비활성화 하여이 문제를 해결했습니다 .
다음은 모든 Windows 컴퓨터에서이 작업을 수행하는 방법에 대한 빠른 가이드입니다.
- 보도 Windows 키 + R은 실행 대화 상자를 엽니 다. 그런 다음 텍스트 상자에 'cmd'를 입력 한 다음 Ctrl + Shift + Enter 를 눌러 상승 된 CMD 터미널을 엽니 다.
참고 : UAC (사용자 계정 컨트롤)에 도착하면 예 를 클릭 하여 관리자 액세스 권한을 부여하십시오.
- 승격 된 CMD 터미널에 들어가면 다음 명령을 입력하고 Enter 키를 눌러 HyperVisor의 상태를 확인합니다.
bcdedit
참고 : hypervisorlaunchtype 상태 가 Disabled로 설정된 경우 아래의 다음 단계를 건너 뛰고 바로 방법 3으로 이동하십시오 .
- 결과가 나오면 hypervisorlaunchtype 섹션으로 스크롤 하여 상태가 Auto 로 설정되어 있는지 확인합니다 .

- hypervisorlaunchtype 상태가 Auto로 표시 되는 경우 다음 명령을 입력하거나 붙여넣고 Enter 키 를 눌러 상태를 Disabled 로 설정합니다 .
bcdedit / set hypervisorlaunchtype 끄기
- 명령이 성공적으로 처리 된 후 상승 된 CMD 터미널을 닫은 다음 호스트 컴퓨터를 다시 시작합니다.
- 다음에 시작할 때 VirtualBox 가상 머신을 시작하고 문제가 이제 해결되었는지 확인합니다.

동일한 문제가 여전히 지속되는 경우 아래의 다음 잠재적 인 해결 방법으로 이동하십시오.
3. Device Guard / Credential Guard 비활성화
영향을받는 다른 사용자는 Gpedit (로컬 그룹 정책 편집기)를 사용하여 Device Guard ( Credential Guard 라고도 함 )를 비활성화하여 Hyper-V 오류로 인해 원시 모드를 사용할 수 없음 을 수정했습니다 .
밝혀진 바와 같이, 보안을위한 엔터프라이즈 관련 소프트웨어 및 서비스의 이러한 조합은 특정 VirtualBox VM 기능과 충돌 할 수 있습니다. 이것이 VERR_SUPDRV_NO_RAW_MODE_HYPER_V_ROOT 의 원인 인 경우 로컬 그룹 정책 편집기를 통해 Device Guard를 비활성화하여 문제를 쉽게 해결할 수 있습니다.
그러나 모든 Windows 버전에 기본적으로 Gpedit 유틸리티가있는 것은 아닙니다. Windows 10 Home 및 기타 관련 하위 버전에는 포함되지 않습니다. 그러나 Windows 10에 gpedit.msc 를 설치 하기 위해 수행 할 수있는 단계가 있습니다 .
Windows 버전에서 로컬 그룹 정책 편집기에 액세스 할 수 있는지 확인한 후 장치 가드 비활성화에 대한 빠른 가이드는 다음과 같습니다.
- 보도 Windows 키 + R은 실행 대화 상자를 엽니 다. 그런 다음 'gpedit.msc' 를 입력 한 다음 Enter 키 를 눌러 로컬 그룹 정책 편집기 를 엽니 다 .

참고 : UAC (사용자 계정 컨트롤) 프롬프트 가 표시되면 예 를 클릭 하여 관리 권한을 부여 하십시오 .
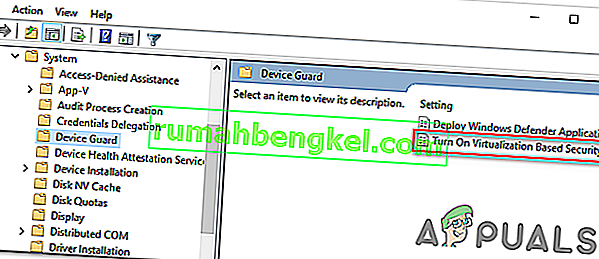
- 로컬 그룹 정책 편집기에 들어가면 왼쪽 메뉴를 사용하여 다음 위치로 이동합니다.
로컬 컴퓨터 정책> 컴퓨터 구성> 관리 템플릿> 시스템> Device Guard
- 올바른 위치에 도착한 후 Gpedit 유틸리티의 오른쪽 섹션으로 이동 하여 가상화 기반 보안 켜기를 두 번 클릭합니다 .
- 당신이 내부에 들어가면 가상화 기반 보안의 전원을 켜고 창, 단순히 상태 변경 사용 안 함을 클릭 적용 하여 변경 사항을 저장합니다.

- 이 작업을 수행 한 후에는 아직 컴퓨터를 다시 시작 하지 마십시오 . 대신 Windows 키 + R 을 누르고 ' cmd '를 입력 한 다음 Ctrl + Shift + Enter 를 눌러 관리자 권한 명령 프롬프트를 엽니 다 .
참고 : 당신이 볼 때 UAC (사용자 계정 컨트롤) 프롬프트를, 예를 클릭 CMD 터미널 관리자의 허가를 부여합니다.
- CMD를 창 내부에서 다음 명령하고 Enter 키를 붙여 입력 여전히이 문제가 발생할 수 있습니다 관련 EFI 변수를 삭제하는 각각 후에 :
mountvol X: /s copy %WINDIR%\System32\SecConfig.efi X:\EFI\Microsoft\Boot\SecConfig.efi /Y bcdedit /create {0cb3b571-2f2e-4343-a879-d86a476d7215} /d "DebugTool" /application osloader bcdedit /set {0cb3b571-2f2e-4343-a879-d86a476d7215} path "\EFI\Microsoft\Boot\SecConfig.efi" bcdedit /set {bootmgr} bootsequence {0cb3b571-2f2e-4343-a879-d86a476d7215} bcdedit /set {0cb3b571-2f2e-4343-a879-d86a476d7215} loadoptions DISABLE-LSA-ISO,DISABLE-VBS bcdedit /set {0cb3b571-2f2e-4343-a879-d86a476d7215} device partition=X: mountvol X: /d copy %WINDIR%\System32\SecConfig.efi X:\EFI\Microsoft\Boot\SecConfig.efi /Y bcdedit /create {0cb3b571-2f2e-4343-a879-d86a476d7215} /d "DebugTool" /application osloader bcdedit /set {0cb3b571-2f2e-4343-a879-d86a476d7215} path "\EFI\Microsoft\Boot\SecConfig.efi" bcdedit /set {bootmgr} bootsequence {0cb3b571-2f2e-4343-a879-d86a476d7215} bcdedit /set {0cb3b571-2f2e-4343-a879-d86a476d7215} loadoptions DISABLE-LSA-ISO,DISABLE-VBS bcdedit /set {0cb3b571-2f2e-4343-a879-d86a476d7215} device partition=X: mountvol X: /d참고 : X는 사용하지 않는 드라이브의 자리 표시 자입니다. 그에 따라 값을 조정하십시오.
- After every command is processed successfully, restart the host machine and see if the problem is resolved at the next startup.


In case you’re still encountering the same “Raw-mode is unavailable courtesy of Hyper-V” error, move down to the next method below.
4. Disable Core Isolation in Windows Defender
As it turns out, a security feature from the default AV can also be responsible for this issue. On Windows 10, Windows Defender has a feature colled Core Isolation – it’s essentially an extra layer of virtualization-based security that’s designed to repel more sophisticated attacks.
However, this security feature is known to interfere with the well-functioning of virtual machines (especially the ones facilitated by 3rd-party alternatives.
Several affected users that were also encountering the “Raw-mode is unavailable courtesy of Hyper-V” error have confirmed that they were finally able to fix the issue by enforcing some modifications that allowed them to disable Core isolation from the settings menu of Windows Security.
Here’s a quick guide on disabling Core Isolation from the settings menu of Windows Defender:
- Press Windows key + R to open up a Run dialog box. Next, type “ms-settings:windowsdefender” inside the text box and press Enter to open up the Windows Security tab (former Windows Defender) of the Settings app.

- Once you’re inside the Windows Security tab, move over to the right-hand section and click on Device Security under Protection areas.
- Next, scroll down through the list of available options and click on Core isolation details (under Core isolation).
- Inside the Core isolation menu, ensure that the toggle associated with Memory integrity is set to Off.
- Once the modification is enforced, restart your computer and see if the problem is fixed at the next startup.


In case the toggle associated with Core Isolation is greyed out or you get an error message when you try to set it to OFF, here’s a quick guide on achieving the same result via Registry Editor:
- Press Windows key + R to open up a Run dialog box. Next, type ‘regedit’ inside the text box and press Enter to open up Registry Editor. Then, click Yes at the UAC (User Account Prompt) to grant administrative privileges.

- Inside Registry Editor, use the left-hand section to navigate to the following location:
Computer\HKEY_LOCAL_MACHINE\SYSTEM\CurrentControlSet\Control\DeviceGuard\Scenarios\CredentialGuard
Note: You can either navigate there manually or you can post the location directly into the navigation bar and press Enter to get there instantly.
- After you manage to arrive at the correct location, move over to the right-hand section and double-click on the Enabled key.
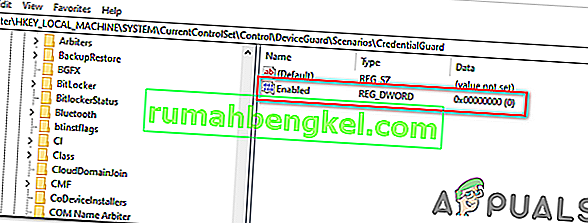
- After you manage to open the Enabled Value, leave the base to Hexadecimal and change the Value data to 0.

- Click Ok to save the modification, then close Registry Editor and restart your computer to see the changes.
- At the next machine startup, repeat the action that was previously causing the VERR_SUPDRV_NO_RAW_MODE_HYPER_V_ROOT error code and see if the problem is still occurring.


In case the issue is still not resolved, move down to the next potential fix below.
5. Enable Virtualization in BIOS or UEFI
Another potential reason that might cause this problem is an instance where hardware virtualization is disabled from BIOS or UEFI settings. Keep in mind that virtualization is enabled by default on every piece of new hardware nowadays, older computer configurations might not have this option enabled by defaults.
If you have an older PC configuration, you might need to enable hardware virtualization manually from your BIOS or UEFI settings. Several affected users have confirmed that the issue was completely resolved after they did this.
Here’s a quick guide on enabling Virtualization from your BIOS or UEFI settings:
- In case you have a BIOS-powered computer, start it up and start pressing the Setup key repeatedly as soon as you see the startup screen. With most configurations, the Setup key is either one of the F keys (F2, F4, F6, F8) or the Del key.
 Note: If you’re using a UEFI-based computer, follow the steps (here) to boot directly into the Advanced Startup options menu. Once you’re there, you can access the UEFI firmware settings directly from that menu.
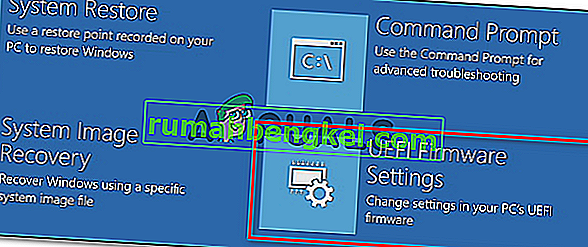
- As soon as you land in your BIOS or UEFI settings, start browsing the menus to find your motherboard equivalent to the virtualization technology (Intel VT-x, Intel Virtualization Technology, AMD-V, Vanderpool, etc.)
- When you manage to locate it, ensure that you set it to Enabled.
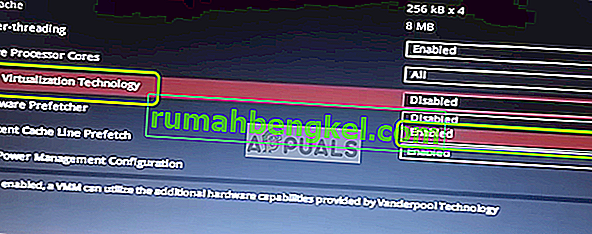
Note: In most cases, you will find this option under Processor, Security, Chipset, Advanced, Advanced Chipset Control or Advanced CPU configuration. But keep in mind that your screen might be wildly different from ours depending on the motherboard that you’re using and the CPU manufacturer. In case you’re not able to find the option by yourself, search online for specific steps according to your configuration.
- After you manage to enable the virtualization technology, save the changes you made to your BIOS or UEFI settings and restart your computer to allow it to boot normally.
- At the next startup sequence, repeat the action that was causing the “Raw-mode is unavailable courtesy of Hyper-V” error and see if the problem is now resolved.
 Note: If you’re using a UEFI-based computer, follow the steps (here) to boot directly into the Advanced Startup options menu. Once you’re there, you can access the UEFI firmware settings directly from that menu.

In case the same problem is still persisting, move down to the next potential fix below.