Nord VPN은 VPN 세계에서 오래된 플레이어 중 하나이며 Windows 응용 프로그램은 PC 세계에서 최고로 간주됩니다. Nord VPN은 기능과 유연성면에서 매우 다양합니다. 크로스 플랫폼 지원 외에도 다른 국가에 위치한 다양한 서버를 선택할 수 있습니다.

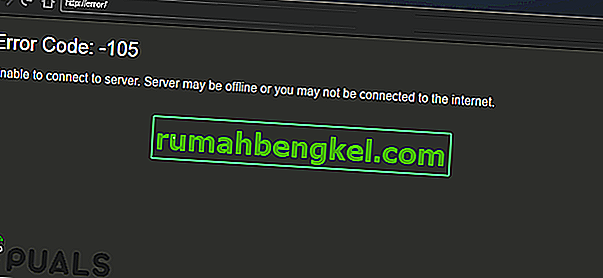
응용 프로그램이 꽤 오랫동안 시장에 나와 있음에도 불구하고 사용자는 Nord VPN에 연결할 수 없다고보고합니다. 잠재적 인 업데이트 후 연결을 중지하거나 DNS 서버에 대한 요청이 '시간 초과'응답을 반환합니다.
Nord VPN이 연결되지 않는 원인은 무엇입니까?
VPN은 컴퓨터 시스템의 전체 인터넷 아키텍처를 사용하기 때문에 Nord VPN이 제대로 연결되지 않는 데에는 몇 가지 이유가 있습니다. 이들 중 일부는 아래에 나열되어 있습니다.
- IPv6 : 분명히 Nord VPN은 통신에서 IPv6 프로토콜을 지원하지 않습니다. 따라서 이것이 활성화되면 연결할 수 없습니다.
- 타사 프로그램 : 타사 프로그램은 소프트웨어 시스템과 충돌하고 리소스를두고 경쟁하는 것으로 알려져 있습니다. 따라서 제대로 연결되지 않습니다.
- 네트워크 어댑터 : Nord는 별도의 네트워크 어댑터를 사용하여 인터넷과 통신하기 때문에 네트워크 어댑터가 제대로 작동하지 않아 다시 시작해야 할 수 있습니다.
- 네트워크 오류 : 때때로 컴퓨터의 네트워크 구성이 오류 상태로되어 전혀 연결되지 않을 수 있습니다. 이 경우 모든 변수를 새로 고칠 수 있습니다.
솔루션을 시작하기 전에 인터넷이 실제로 작동 하는지 확인해야합니다 . 인터넷이 제대로 작동하지 않으면 Nord는 적절한 연결을 설정할 수 없으며 터널링 된 네트워크에 대한 액세스를 제공 할 수 없습니다.
사설 네트워크 (학교, 직장 또는 병원과 같은 공공 장소가 아님)를 사용하고 있고 프록시가 관여하지 않는지 확인하십시오. 인터넷이 제대로 작동하는지 다시 확인했으면 계속 진행하십시오.
해결 방법 1 : IPv6 비활성화
IPv6 (인터넷 버전 프로토콜 6)은 컴퓨터의 네트워킹 아키텍처에서 최신 버전의 IP입니다. 기본적으로 우리는 여전히 IPv4를 사용하고 있으며 여전히 IPv6로 영구적으로 전환되지 않았습니다. 그러나 인터넷 연결을 위해 IPv6를 사용하기 시작한 여러분 중 일부가있을 수 있습니다. IPv6가 Nord VPN에서 제대로 작동하지 않는 것 같습니다. 따라서 우리는 그것을 비활성화하고 다시 확인합니다.
- 작업 표시 줄에있는 네트워크 아이콘을 마우스 오른쪽 버튼으로 클릭하고 네트워크 및 인터넷 설정 열기를 선택 합니다 . 이제 설정에서 어댑터 옵션 변경 옵션을 클릭하십시오 .

- 어댑터 설정에서 사용중인 어댑터를 마우스 오른쪽 버튼으로 클릭하고 속성을 선택 합니다.
- 어댑터 속성 에서 IPv6 옵션을 선택 취소 하고 IPv4가 활성화되어 있는지 확인하십시오. 변경 사항을 저장하고 종료합니다. 이제 컴퓨터를 다시 시작하고 오류가 해결되었으며 Nord VPN에 연결할 수 있는지 확인하십시오.

해결 방법 2 : 타사 응용 프로그램 확인
운영 과정에서 Nord VPN과 충돌하는 것처럼 보이는 다른 응용 프로그램과 프로그램이 많이 있습니다. 리소스에 액세스하려는 응용 프로그램이 둘 이상인 경우 경쟁 조건이 발생하고 예상대로 작동하지 않습니다.

작업 관리자 (Windows + R 및 'taskmgr')를 불러와 백그라운드에서 실행중인 모든 응용 프로그램을 확인해야합니다. 문제를 일으키는 것으로 알려진 애플리케이션 중 하나는 Glasswire Elite 입니다. Nord VPN에 연결하려고 할 때 제거하거나 비활성화되어 있는지 확인하십시오.
참고 : 컴퓨터를 클린 부팅 할 수도 있습니다. 이렇게하면 모든 외부 타사 응용 프로그램이 비활성화되고 필요한 응용 프로그램 만 실행됩니다. 이제 연결 설정을 시도 할 수 있습니다. 성공하면 문제를 일으키는 일부 응용 프로그램이 있음을 의미합니다. 각 응용 프로그램을 활성화하고 다시 확인하여 돌아갈 수 있습니다.
해결 방법 3 : 서버 위치 변경
Nord VPN은 사용자에게 서버 위치를 선택할 수있는 선택권을 제공합니다. 이러한 서버는 전 세계에 흩어져 있으며 지리적 위치에 따라 연결을 제공합니다. 즉, 가까운 서버가 더 빠를 것으로 예상됩니다. 연결하려는 서버 위치를 변경하여 연결되지 않는 문제가 해결되는지 확인합니다.
- Nord VPN을 실행 하고 애플리케이션 상단 에있는 서버 제목을 클릭 합니다.

- 이제 선택 전과 후와 다른 서버를 선택하고 VPN을 다시 실행하십시오. 동일한 동작이 발생하면 다른 서버를 선택하고 다른 웹 사이트에서 네트워크를 테스트 해보십시오.
해결 방법 4 : 네트워크 / TAP 어댑터 다시 시작
Nord VPN은 정보를 전달하는 데 사용할 수있는 가상 네트워크 어댑터를 컴퓨터에 만듭니다. Nord VPN이 VPN 연결을 시작하고 유지할 수 있도록 설정을 수정하는 브리지 역할을합니다. 때때로 이것은 VPN 서버에 연결되지 않는 오류 상태가됩니다. 어댑터를 올바르게 다시 시작하여 모든 구성이 다시 시작되었는지 확인합니다.
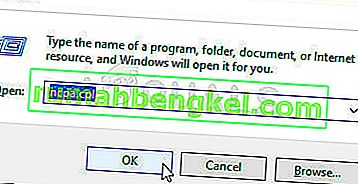
- Windows + R을 누르고 " ncpa. cpl ”을 입력하고 Enter를 누릅니다.
- 모든 네트워크 어댑터가 사용자 앞에 나열됩니다. TAP 어댑터를 선택하고 마우스 오른쪽 버튼으로 클릭 한 다음 비활성화를 선택 합니다 .

- 비활성화 한 후 잠시 기다리십시오. 그런 다음 다시 마우스 오른쪽 버튼으로 클릭하고 사용을 선택 합니다. 이제 Nord VPN 연결을 시도하고 이것이 트릭인지 확인하십시오.
해결 방법 5 : 네트워크 스택 플러싱
컴퓨터의 네트워크 스택을 플러시 (새로 고침)하면 다양한 VPN 관련 문제 (Nord 포함)가 해결되는 수많은 예가 있습니다. 이 프로세스는 DNS 및 IP 설정을 플러시하고 응용 프로그램과 충돌 할 수있는 부적절한 설정이 없는지 확인합니다.
- Windows + S를 누르고 대화 상자에 "명령 프롬프트"를 입력 한 다음 응용 프로그램을 마우스 오른쪽 버튼으로 클릭 하고 관리자 권한으로 실행을 선택 합니다.
- 상승 된 명령 프롬프트에서 다음 명령을 하나씩 실행 한 다음 각 명령 다음에 Enter 키를 누릅니다.
ipconfig / release ipconfig / flushdns ipconfig / renew netsh winsock 재설정 netsh 인터페이스 ipv4 재설정 netsh 인터페이스 ipv6 재설정 netsh winsock 재설정 카탈로그 netsh int ipv4 재설정 reset.log netsh int ipv6 재설정 reset.log

- 이제 명령 프롬프트를 닫고 Nord VPN을 다시 시작하십시오. 제대로 연결할 수 있는지 확인하십시오.
해결 방법 6 : Nord VPN 다시 설치 (TAP 어댑터와 함께)
위의 모든 방법이 작동하지 않으면 Nord 설치가 적절하고 설치 파일에 문제가 없는지 확인해야합니다. Nord VPN이 어댑터를 관리하고 사용 전용이므로 TAP 어댑터도 프로세스에서 다시 설치됩니다. 관리자로 로그인했는지 확인하십시오. 재설치가 작동하지 않으면 서비스를 입력하는 자격 증명 이 만료되지 않았 는지 확인하십시오 .
- Windows + R을 누르고 대화 상자에 "appwiz.cpl"을 입력 한 다음 Enter를 누릅니다.
- 애플리케이션 관리자 에서 목록에서 Nord VPN 항목을 검색하고 마우스 오른쪽 버튼으로 클릭 한 다음 제거를 선택 합니다 .

- 이제 컴퓨터를 다시 시작 하고 Nord VPN의 공식 웹 사이트에서 애플리케이션을 다시 다운로드하십시오. 이제 자격 증명을 입력 한 후 다시 연결을 시도하고 VPN 연결을 올바르게 설정할 수 있는지 확인하십시오.
솔루션 7 : 대체 VPN 서비스 사용
Windows 시장에는 수많은 VPN 클라이언트가 있습니다. 그러나 독자 나 CyberGhost를 사용해 보는 것이 좋습니다. 이 VPN 서비스는 가능한 한 간단하며 다른 국가에있는 서버도 제공합니다. Netflix와 BBC를 쉽게 스트리밍 할 수있는 별도의 VPN 서버도 있습니다. 아래 단계에 따라 애플리케이션을 다운로드하고 즉시 안전하게 연결하십시오.
- (여기)에서 CyberGhost를 다운로드 하세요.

- VPN을 다운로드 한 후 컴퓨터에 설치 하십시오. 적절한 권한을 요청받을 수 있습니다. 관리자로 로그인했는지 확인하고 요청 된 모든 권한에 대해 예 를 누릅니다 .
- CyberGhost가 컴퓨터에 설치된 후 실행 하십시오. 여기에서 실제 위치로부터의 거리와 함께 사용 가능한 다양한 서버 목록을 볼 수 있습니다 (거리가 멀다는 것은 인터넷 속도가 느리다는 것을 의미합니다).

- 서버를 선택한 후 애플리케이션 오른쪽 에있는 전원 버튼을 클릭 합니다. 토렌트 및 스트리밍을위한 전용 서버를 선택할 수도 있습니다 (왼쪽 탐색 창에 있음).
해결 방법 8 : 방화벽 비활성화
In some cases, the default Windows Firewall might be preventing the application from working properly. Therefore, in this step, we will first be allowing it through the Firewall and make sure that it isn’t blocked by the Firewall and then we will also make sure that Windows Defender has it added as an exception. For that:
- Press “Windows” + “R” to launch the Run prompt.
- Type in “ControlPanel” and press “Enter” to launch the classical control panel interface.

- Click on the “View by:” button, select “Large Icons” and then click on the Windows Defender Firewall option.
- Select the “Allow an app orfeature through the Firewall” button on the left pane and then click on the “Change Settings” button and accept the prompt.
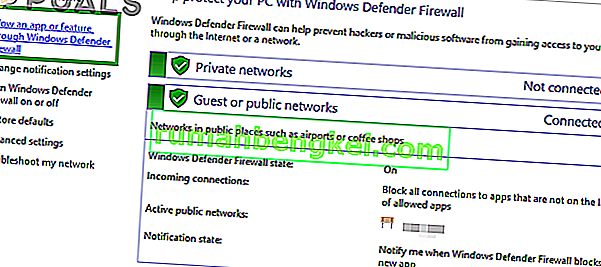
- From here, make sure that you check both the “Public” and the “Private” options for Nord VPN and its related applications/drivers.
- Save your changes and exit out of the window.
- After that, press “Windows” + “I” to launch the settings and click on the “Updateand Security” option.
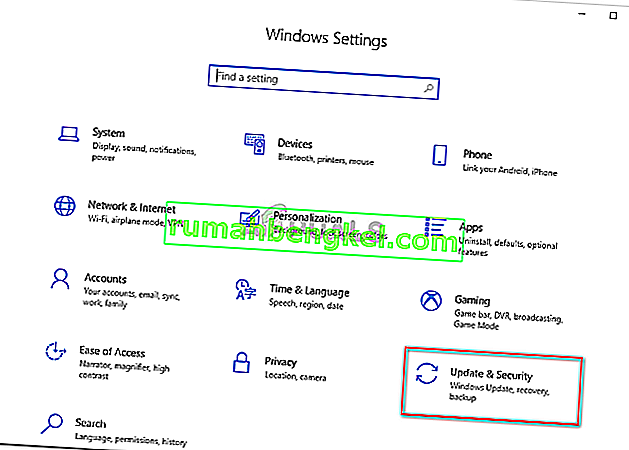
- From the left pane, click on the “Windows Security” button and then click on the “Virus and Threat Protection” button.
- Select the “Manage Settings” button under the Virus and Threat Protection Settings heading.
- Scroll down and click on the “Add or Remove Exclusions” button in the next window.
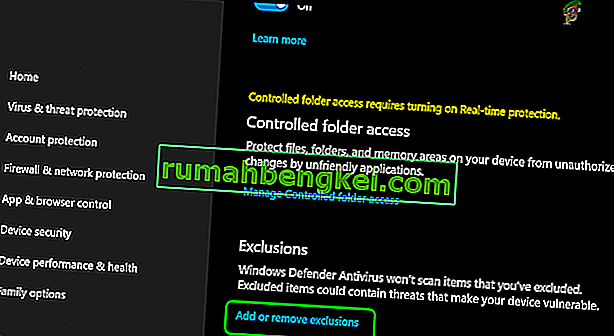
- Click on the “Add an Exclusion” option and select “Folder’ from the File type.
- Make sure to specify the Nord VPN folder and exit out of this window after saving your changes
- Check and see if doing so has fixed the issue with Nord VPN not connecting.


Solution 9: Change NordVPN Protocol
It is possible that Nord VPN might be running into issues while trying to connect to its servers due to the protocol configuration in its settings. If one type of protocol isn’t working for you, it is always recommended to try and switch to the other protocol to make sure that the issue isn’t tied to the wrong selection of the protocol type automatically or manually. For that:
- Launch NordVPN and make sure to disconnect from any currently active sessions.
- Click on the “Gear” icon on the top right corner and go into the settings.
- Click on the “Advanced” option from the left-hand side menu.
- Click on the “Protocol” dropdown and check on “TCP”.
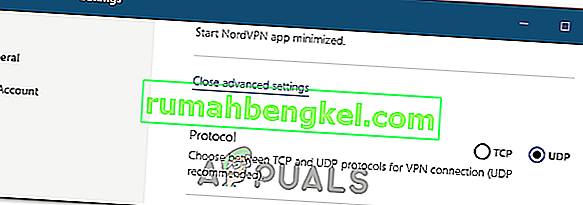
- This should change your protocol from TCP to UDP.
- Check to see if doing so fixes the issue for your computer.
- To Verify that none of the protocols work, make sure to repeat the steps and select “UDP” instead of TCP and then check again.
- If none of the selected protocols are able to make a connection with the server, move on to the other fixes.

Solution 10: Changing DNS Server Configuration
DNS Servers are used by the computer to establish a stable and secure internet connection with other sites on the internet, however, if the computer is unable to detect the DNS settings properly, or if the selected DNS server is facing outage, Nord VPN might not connect properly. Therefore, in this step, we will be changing the DNS configuration to ensure that DNS isn’t an issue. For that:
- Press “Windows” + “R” to launch the Run prompt.
- Type in “ncpa.cpl” and press “Enter” on the keyboard to launch the network configuration panel.
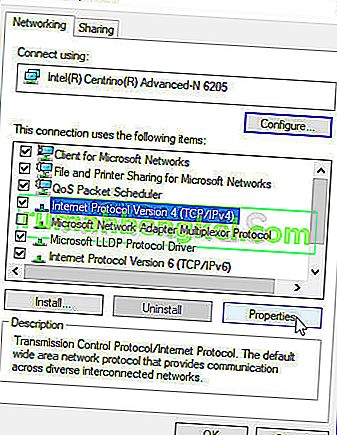
- Right-click on your internet connection and select the “Properties” option.
- Double click on the “Internet Protocol Version4 (TCP/IPV4)” option and check on the “Use the following DNS addresses” button.
- At first, type in “8.8.8.8” and “8.8.4.4” in the primary and the secondary DNS addresses field respectively and click on “OK”. After that, check to see if NordVPN is connecting, if it isn’t, try to use “103.86.96.100” and “103.86.99.100” in the primary and the secondary fields respectively.
- Check to see if you are able to make a connection by selecting those DNS servers.


Solution 11: Opening Ports
For some people, the issue might arise if the ports that NordVPN uses to communicate with its servers are being blocked by your router. For security reasons most routers often block ports used by VPN/Network Tools to prevent any alterations to your connections and if that is the case, we will have to open the ports by logging in to the router’s control panel. For that:
- Press “Windows” + “R” to launch the Run prompt and type in “cmd” and then press “Ctrl” + “Shift’ + “Enter” keys on your keyboard to provide admin permissions.

- Type in the following command in the command prompt to list the IP information.
ipconfig /all
- The computer will list all the information of the network adapters connected to your computer.
- Under the default gateway option, after the mac address, there should be an IP address that should look something like “192.168.x.x”.
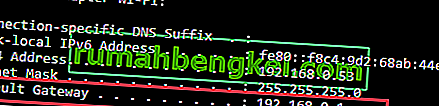
- Copy this IP address and launch your browser.
- Paste the IP address within a new tab on the browser and press “Enter” to navigate to the browser’s login page.
- Once on the login page, log into the control panel with your credentials, both of which, i.e the username and password should be written on the back of your internet router. If not, then the username should be admin and the password should be the Wifi password that you use to connect your devices.
- After logging into the Control panel, look around for a “NAT” or “Port” option that allows you to forward ports.
- Type in “500” and select “UDP” from the list.
- Click on “Save” to forward the 500 UDP port and exit out of the control panel after the change has been made.
- Try connecting with Nord VPN and check to see if the issue persists.


Solution 12: Use Hotspot
Mostly, this error can be fixed simply by employing your mobile’s hotspot connection instead of the Wifi or the Wired connection that you are already using on your computer. This does seem an inconvenience for Data conscious people but it seems to be the only way some people are able to connect through Nord VPN as some routers block it completely.
Note: In addition to this, you can try to change the firmware on your router to avoid any permanent blocks put from the router or to eliminate any bugs with the connection.